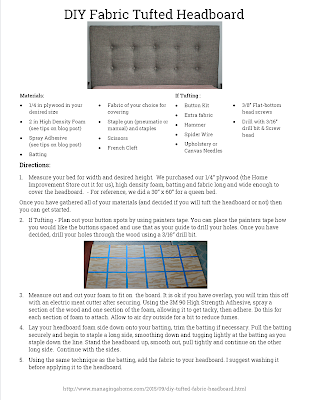
There are TONS of tutorials out there for making a DIY Fabric Headboard, this is not one of them. I am going to walk you through some of the dos and don'ts for creating your own headboard. Since none of the tutorials seemed to run into any problems that we did, I wanted to share our experience and what we did to solve the problems we encountered. So learn from my mistakes and keep this handy when you decide to do your own.
First things first. The good.
- We used this tutorial to figure out the basics, but we learned a LOT along the way.
- We actually used a curtain for our fabric. We loved the look of the curtain and couldn't find fabric that looked similar or that we liked as much. It did increase the cost a bit, but it was worth it since we love it so much. So use any fabric you like :)
- Having a staple gun with a compressor was amazing! We were lucky enough to borrow a friends staple gun and it made the job so much easier.
- If you want it to be a quick project, gather everything together first. You could do this in an afternoon if you needed to.
Here are some dos and don'ts we are sharing with you from some of our snafus.
| DON'T | DO | |
|---|---|---|
| Spray Adhesive |
DON'T use a cheap spray adhesive to attach the foam to the wood. When we used a different brand, the foam started to lift at the sides and top. You want to make sure that the foam is really stuck to the wood before you add your batting.
|
DO use a high quality adhesive that has a strong stick. We used 3M 90 Hi-Strength Adhesive and it worked amazingly! You need to spray it on both surfaces in order for it to bond.
|
| High Density Foam |
DON'T buy all of this at the craft store. It is soooo expensive. I needed just a 12" x 6" piece to fill one spot so I bought it there for under $5 from scraps.
|
DO purchase your foam online. There are several options, but I am an Amazon fan, so we ordered this exact one. It was amazing and when cut to size I needed just one small piece.
|
| Creating Buttons |
DON'T underestimate the thickness of your fabric. We couldn't get the buttons to snap in place.
|
DO use extra tools to make sure the buttons hold. We were able to use a hammer to help make the buttons. See the pictures below for tutorial.
|
| 1. Line up your cut fabric with the center of the mold. 2. Flip the mold over. 3. Press button top into mold. 4. Fold fabric around the button top and place on your back. 5. Using the push tool, keep the back on the button in the mold. 6. Using a hammer for leverage, push down on the push tool being sure to push the hammer in a circle. 7. Pop out button. 8. Admire your work. | ||
| Creating the Tufting |
DON'T use staples. The staples would allow to much give in the string, allowing it to slip out after stapling in place.
|
DO use small, flat bottomed wood screws. We added the screws to the wood first, leaving room to spin the string onto the screw then drill it the rest of the way in.
*Just be cautious of the depth of the screw with your wood and make sure it is flat on the bottom of the head - we used 3/8"* |
| Threading for the Tufting |
DO use Spiderwire. It is a super strong fiber that is used for fishing. This was the only thing that was strong enough to keep the buttons in place. We even looped it around the button to help keep it in place.
|
|
| Threading the Headboard |
DON'T use a normal needle. This is nearly impossible.
|
DO use an upholstery needle or I even used a canvas needle because it was longer. The best way is to loop the Spiderwire and place the loop through the eye of the needle. Then slide the needle through to the other side. Now you have a loop for your buttton and you are finished with the needle.
|
| Our Method to Thread the Buttons | 1. Loop the Spiderwire and thread through the eye of the needle. 2. Push the needle through and pull the looped wire out. 3. Thread the wire loop through the button loop. 4. Pull the wire around the button. 5. Pull the wire tight around the button loop. 6 Your button should be secured on the wire. | |
I have included a printable for the whole process, step by step that you can use when you create your own headboard. I also included our dimensions for our Queen sized bed.
I hope that you will be able to learn from our mistakes and have a frustration-free headboard project. Let me know how it goes.


What a great tutorial! Beautiful job!!!
ReplyDelete